✍🏽 Register
Energiser
Every session begins with an energiser. Usually there’s a rota showing who will lead the energiser. We have some favourite games you can play if you are stuck.
- Traffic Jam: re-order the cars to unblock yourself
- Telephone: draw the words and write the pictures
- Popcorn show and tell: popcorn around the room and show one nearby object or something in your pocket or bag and explain what it means to you.
Youtube: Welcome to MigraCode Barcelona 🔗
Goals and expectations
Preparation
Review the presentation in the class. Make sure a Word Cloud app is available. Everyone has to have their computers with internet and access to Slack.
Introduction
The Software Development Course of Code Your Future (CYF) has a particular goal: you get a job in tech! To achieve this, we have expectations of every trainee, and you will also have expectations about CYF. So we are now doing some exercises to align them.
Goals and expectations presentation and exercise
🎯 Goal: Agree with the goals and expectations of the Code Your Future Software Development Course (80 minutes)
Open this presentation and follow the slides.
General Weekly Availability
🤙🏽 FeedbackLearning Objectives
Preparation
Copy this General Weekly Availability
Spreadsheet
for your cohort and share it with everyone. If no one has done this yet, take the initiative and do it.
- Someone in your cohort needs to bookmark this spreadsheet on your cohort channel in Slack.
- Someone in your cohort also needs to do a brief post on Slack linking people to this spreadsheet.
This is one file for the cohort, not one per person.
Introduction
Sharing our general availability means that you and your peers can identify roughly who is available and when.
Why is this important?
Because you can then identify pairs and groups that can help each other, and helping each other is good for the community and your relationship, and makes us feel good about ourselves.
Add your general availability
🎯 Goal: Share your weekly availability with your peers (10 minutes)
- Open to the cohort’s General Weekly Availability spreadsheet.
- Add your name to the next line that is available in column A.
- Use the same colour as the example to identify when you are available.
- Leave non-available slots in grey. (Examples of Non-available slots: school pick-up/drop-off times, eating times, individual studying, part-time job, resting time, exercising times, mental health focus, etc. You do not have to detail what you are doing, but consider these when adding your availability)
Tip: Copy and paste one of the current coloured cells to your cell, this way you don’t have to figure out what’s the correct colour to use.
Identify pairs per week
🤙🏽 FeedbackLearning Objectives
Preparation
Introduction
Looking into the General Weekly Availability that you filled in before the induction, we will use each other’s availability and identify the best pairs to work together.
To work together, you must be available at similar times - not for the whole week, but for the number of hours needed for prep or coursework in pairs.
PS: It’s important to pair with different people in your cohort. There is more diversity, there better your professional competencies will evolve.
Creating pairs for the coursework
🎯 Goal: Update the shared file in which trainees can organise teamwork rotas (5 minutes)
On the Fundamentals section of the course, you should have created a rota spreadsheet of the form “XXX X Rota”, replacing the “X”’s with the name of your region and cohort number. For example, “NW 6 Rota” for the cohort in North West and cohort 6.
Double check this rota spreadsheet is bookmarked to your cohort channel and post a link to the spreadsheet on Slack
One trainee needs to update this Google sheet “XXX X Rota” on the cohort drive
- Create a new tab on the spreadsheet called “Pairs Induction”
- The new tab must have two columns, one with the title “Pair 1” and another for “Pair 2.”
- Post a message on the cohort Slack with the shared spreadsheet and the instructions on what to do (see below)
This tab will be the rota of the coursework.
Create pairs considering trainees' availability
🎯 Goal: Connect the people’s availability defining the most effective pairs to work together (10 minutes)
Multiple tasks need to be done to make this exercise happen, but not all of them should be done by one person:
- How many hours of coursework has to be done in pairs? Double check the issues that have a 🫱🏿🫲🏽 Pairs label on this module’s backlog
- Open the “General Weekly Availability” spreadsheet.
- Identify who could pair together, considering their availability.
- Someone should add these pairs to the other spreadsheet (exercise 1).
Lunch
Take your lunch break and be back in an hour!
Git workshop 🔗
Learning Objectives
Git Day 1
Git is a tool for software development that you will likely come to rely on in your software development journey. It might seem complex at first but with continuous practice, you will begin to disentangle the complexity.
💡 Objective
This workshop will deepen your understanding of Git. By the end of this workshop, participants will:
- Navigate a GitHub repository using the VSCode interface
- Fork and clone a repository, create branches, and commit changes using the VSCode interface
- Articulate the difference between a fork and clone
- Explain their mental model of the working tree and the staging area
Setup
- Break out into groups of 5/6 ( depending on volunteer and trainee numbers )
- Use these instructions as a guide to check your understanding, resolve misconceptions and develop your understanding
This workshop starts with a recap based on this week’s prep material…
Exploring GitHub repositories
Recap activity 🕹️
- Trainees do this section in pairs
- ⏲️ 10 mins
Let’s recap some of the things from earlier in the week.
Visit the following repository on GitHub: https://github.com/CodeYourFuture/cyf-demo-repo
Answer the following questions:
a) How many commits are there in the cyf-demo-repo project?
b) Who committed on Oct 31, 2020?
c) What changes did illictonion make in the commit titled “Revert changes accidentally pushed in the past”?
d) How many files were added in the first commit? What were the names of the files?
e) What is the hash for the first commit in the history?
f) What is Claire Bickley’s favourite food?
🧵🗣️ group discussion
- Group discussion
- ⏲️ 10 mins
- A volunteer will need to facilitate this section
A volunteer can facilitate this group discussion by going through the questions above and asking pairs for their feedback. If pairs are unsure / not quite accurate then spend a small amount of time addressing misconceptions.
Remember to ask around for feedback.
Creating a fork 🍴
🕹️ Recap activity
- Trainees do this section in pairs
- ⏲️ 5 mins
Use the guidelines from the prep section of this week to create a fork.
- On one person’s computer, fork this repo: https://github.com/CodeYourFuture/cyf-demo-repo
- 📝 Double-check the URL of your forked repo. How can you tell the fork was successfully created?
Group discussion/demo 🧵 🗣️
- Groups discussion
- ⏲️ 5 mins
- A volunteer will need to facilitate this section
A volunteer will need to navigate and let the group guide them in creating a fork.
🌀 Cloning a repository
🕹️ Recap activity
- Trainees do this section in pairs
- ⏲️ 5 mins
📋 Check your understanding
Before continuing, try answering the following:
❓ what is the difference between a fork and a clone.
Remember to check your answer before continuing.
- Clone your fork of
cyf-demo-repoto your local machine. - Open this local repository using VSCode.
- Use
pwdin your terminal to check you’re in the right place.
Group discussion/demo 🧵 🗣️
- Group discussion/demo
- ⏲️ 5 mins
- A volunteer will need to facilitate this section
A volunteer will need to navigate and let the group guide them in following through the steps in the previous recap activity.
🌳 Creating a branch
🕹️ Recap activity
- Trainees do this section in pairs
- ⏲️ 10 mins
Next, create a local branch called week-1-workshop
Group discussion/demo 🧵 🗣️
- Group discussion/demo
- ⏲️ 10 mins
- A volunteer will need to facilitate this section
Take a break for 10 mins… 🍫
Part 2 - New skills 🧰 - Committing and pushing 📸
🕹️ Activity - Figure it out 🔍
🎯 Goal: Make some local changes and create a local commit on our branch.
- Do this section in pairs
- ⏲️ 15 mins
Follow these instructions carefully.
Our Git timeline starts with some commits like this:
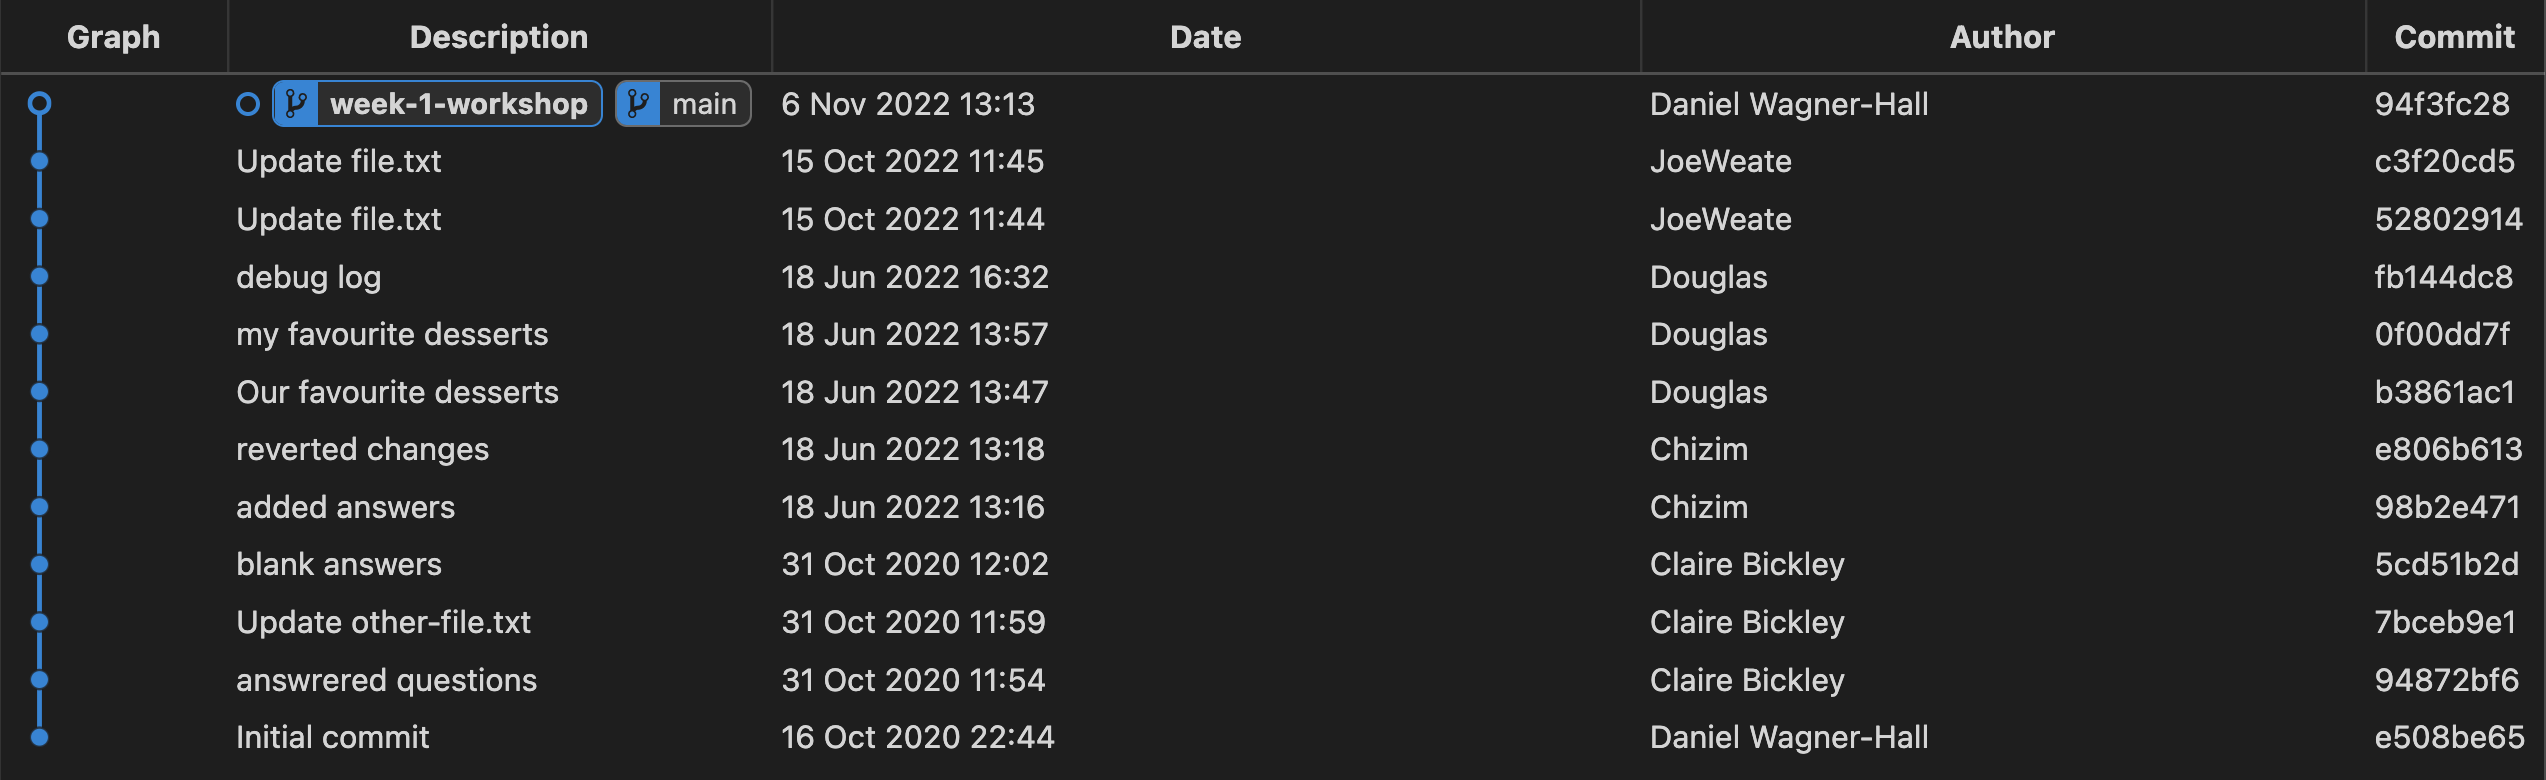
We’re going to figure out how to
- make local changes and commit them to our branch “week-1-workshop”,
so our history looks something like this:
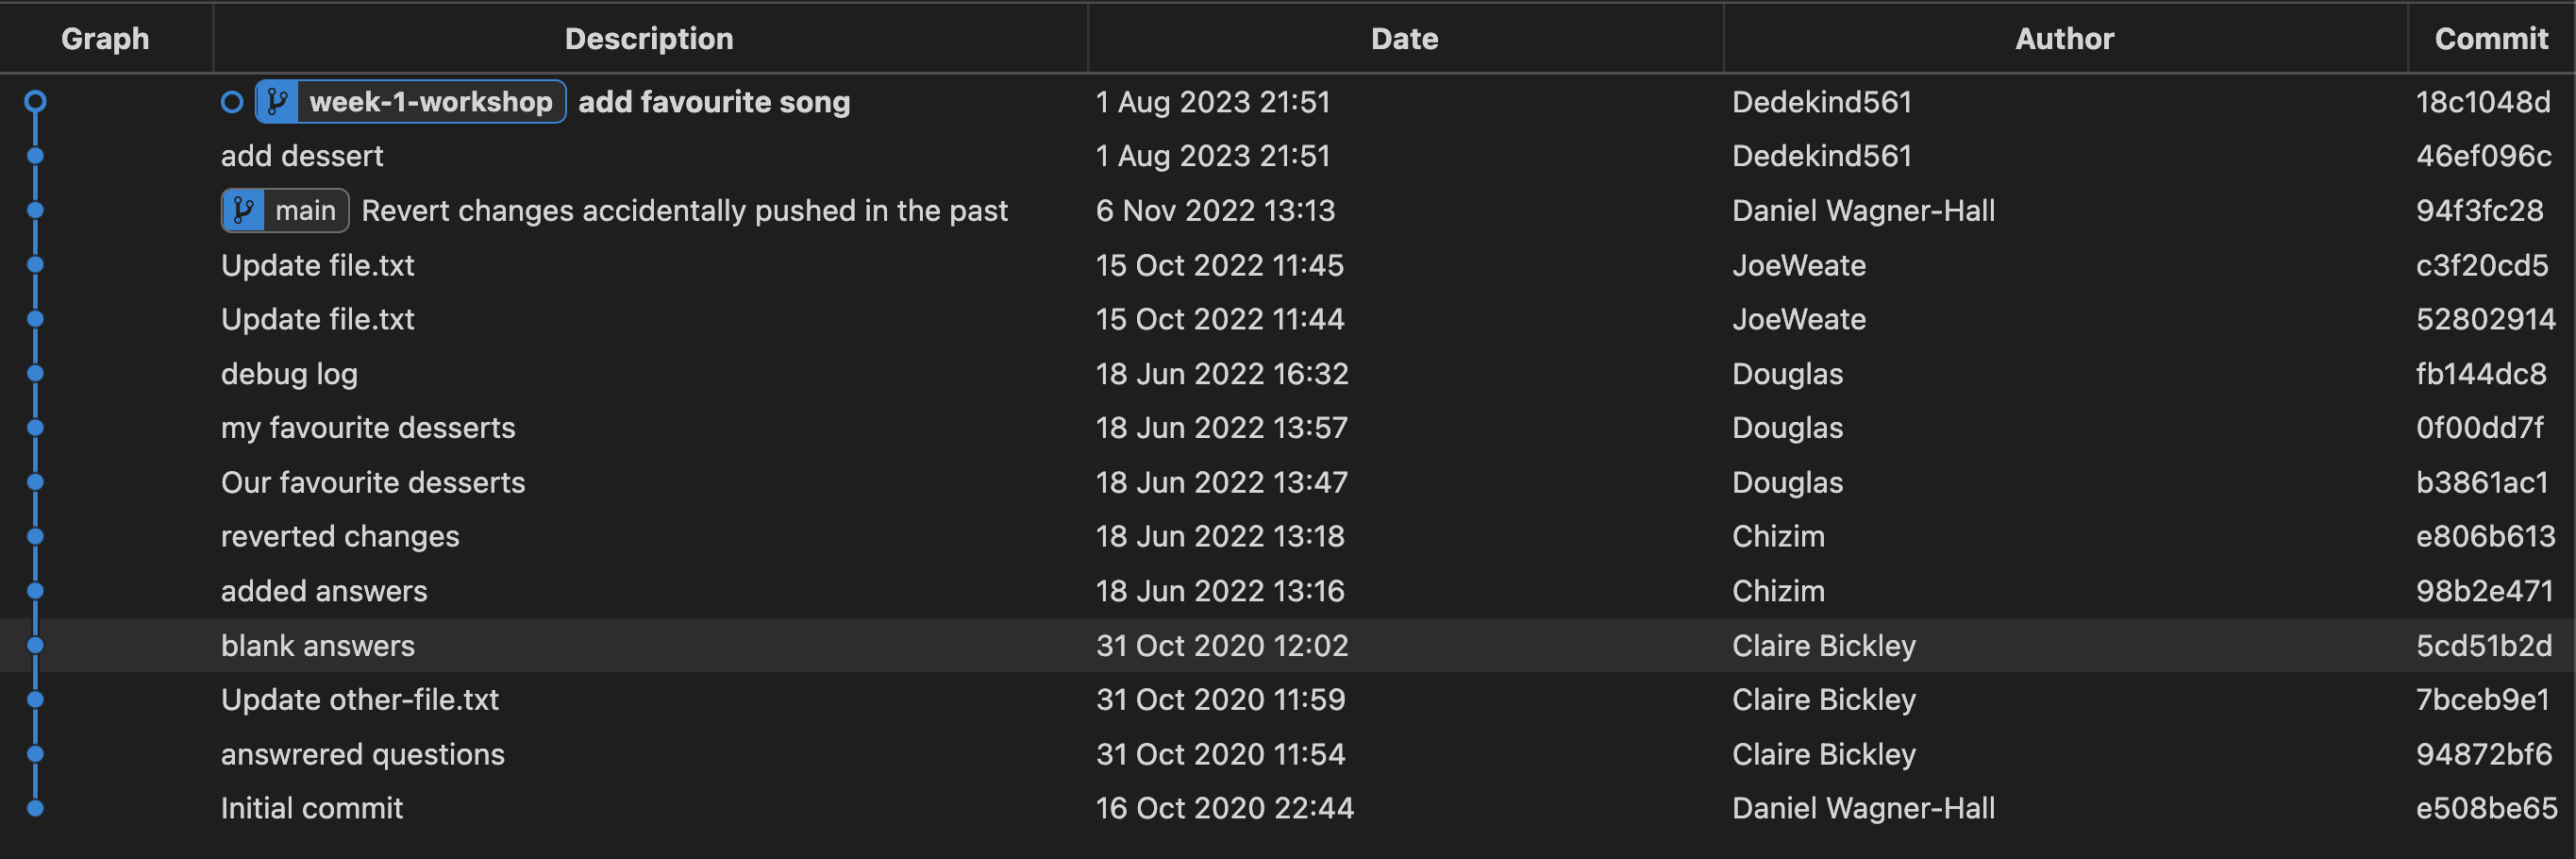
where the most recent commits contain our changes.
To create a commit, we can use the following steps (explained more below):
- Make a change to a file
- View the local changes
- Stage the changes
- Creating the commit
🗄️ 1. Make a change to a file
- Open up your local repo
cyf-demo-repoin VSCode. - Go to the Explorer section of VSCode ( look for a 🔍 icon ).
- Find
file.txtand edit the file with the answer to the questions. - Remember to save the changes to
file.txt.
Tip:
- You can use Cmd + S on a Mac to save changes to a file in VSCode.
- You can use Ctrl + S on a Linux OS to save changes to a file in VSCode.
🔬 2. View the local changes
We want to view the changes we’ve just made to our working directory.
- Locate the Source Control tab in VSCode.

- Go to the Changes section and click on the file you changed - this should now show the changes for the file.
- Try editing the file again in the Explorer tab and check to see the update is visible in the Source Control panel
🟢 3. Stage the changes
We need to tell Git which changes we want to be part of our next commit.
Each commit is a checkpoint we’ve decided to save. When making a commit, we can decide to not include all of our changes in the checkpoint, but just include some of them.
We choose which changes we want to include in a commit by staging our changes.
In the Source Control tab again…
- Go to the file
file.txtand click on the +.
👓 Notice what happens when you carry out step 1.
- View the Staged Changes area in your Source Control panel.
📸 4. Create the commit
Once we’ve staged our changes, then we can commit these changes.
Before we do, we should make sure we’re on the correct branch. Check that you’re on the week-1-workshop branch.
Your VSCode window should look like this: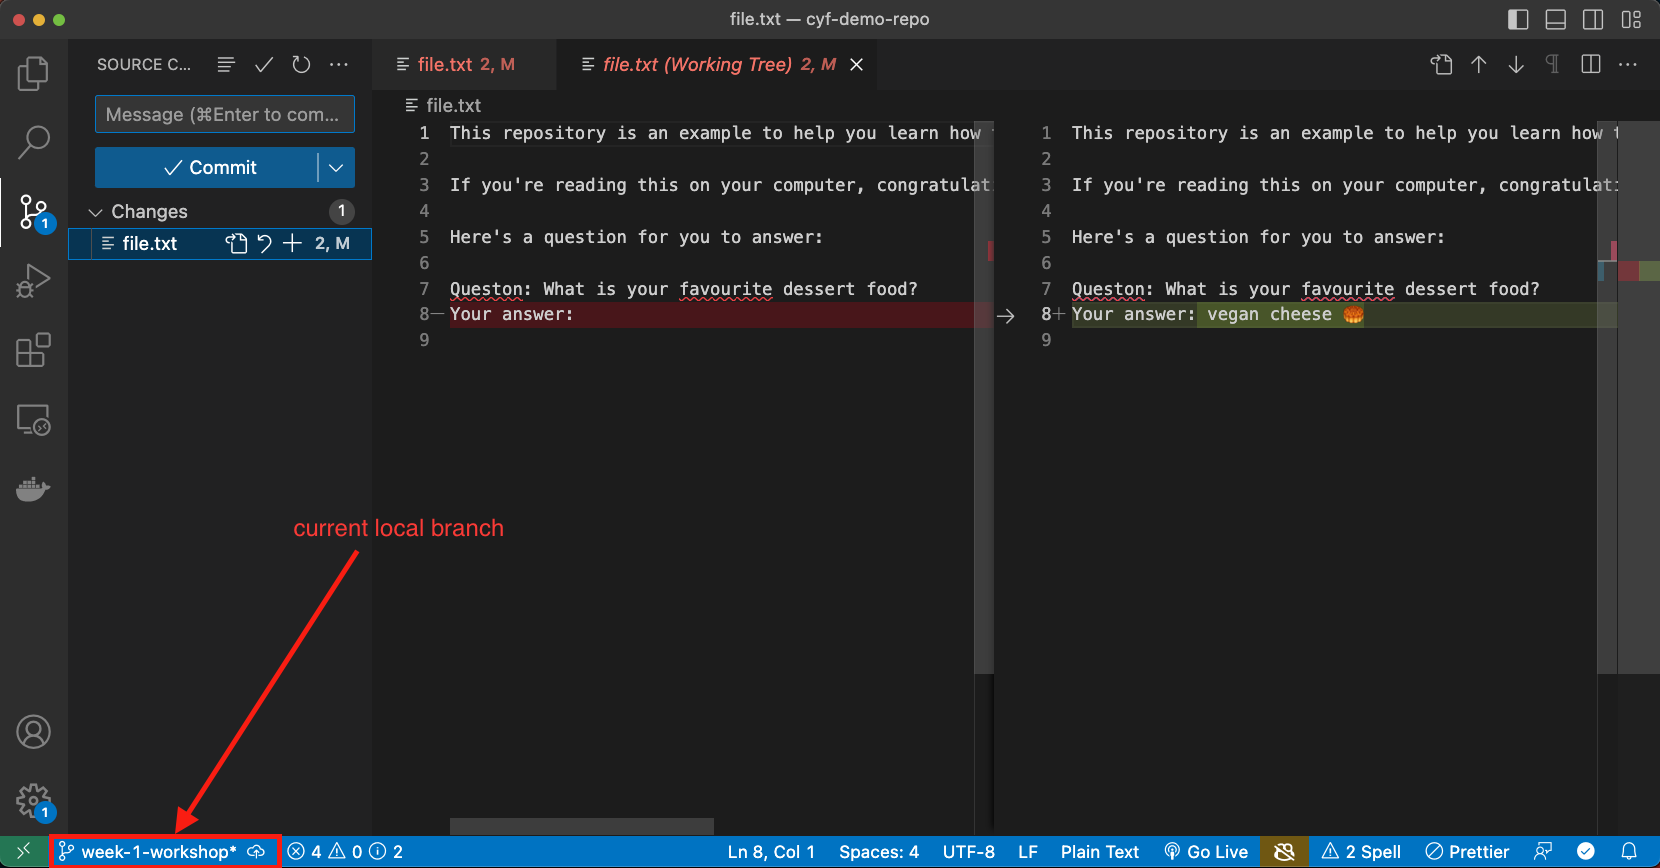
and not like this:
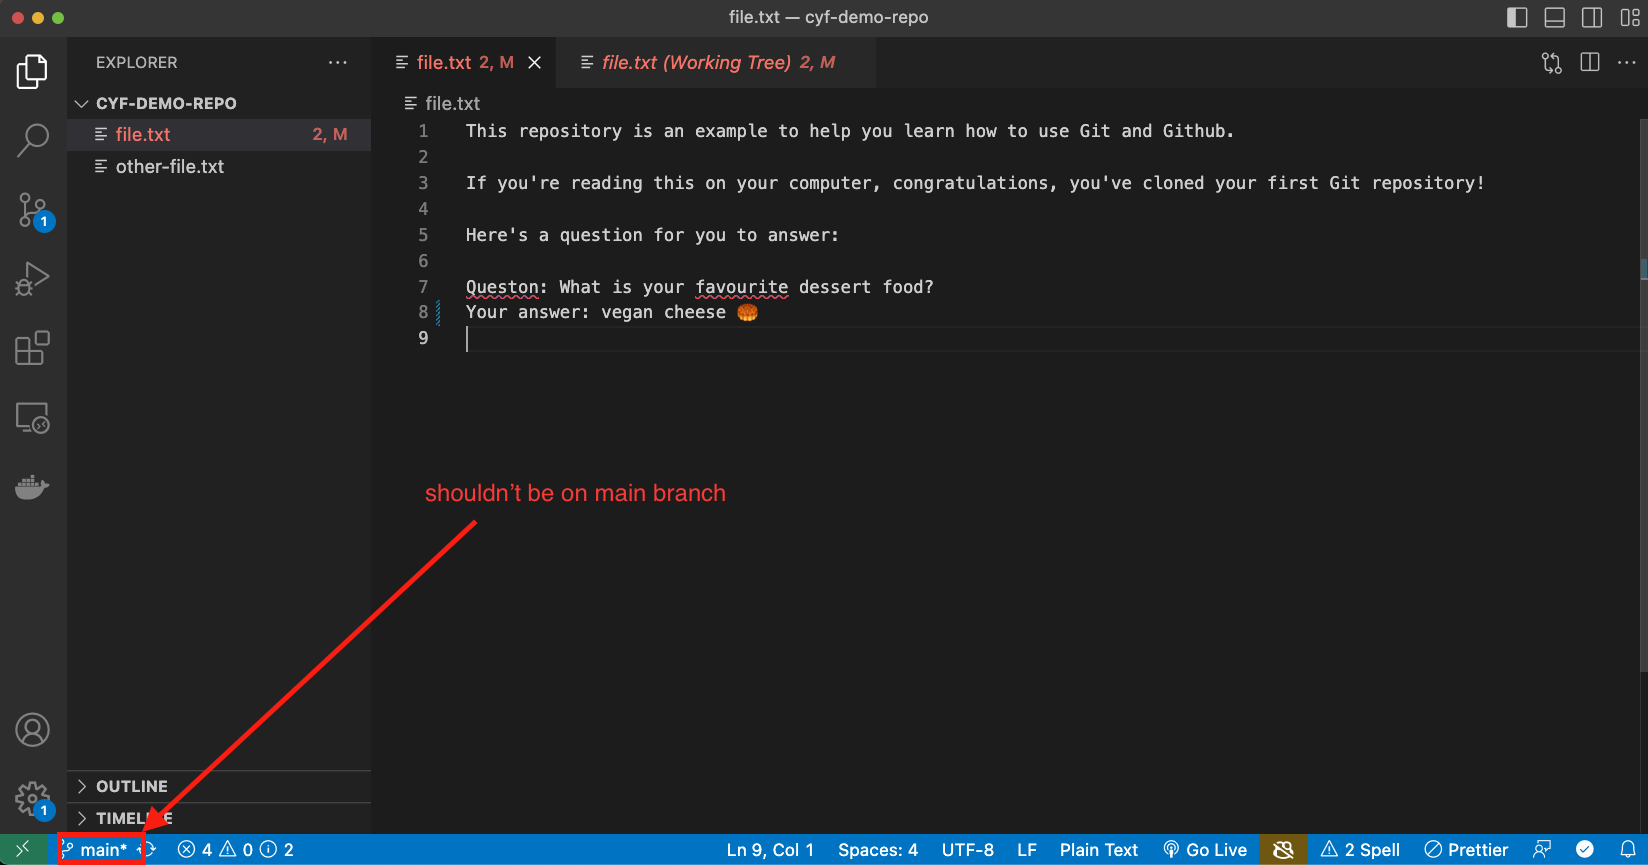
If you’re sure you’re on the right branch:
- Enter a commit message describing briefly what you did in your commit.
- Click Commit to create the Git commit.
📝 Now figure out how many commits you have on your local machine.
🧠 Explain what you think would have happened if you didn’t stage anything in your working directory when you made your commit.
When you’re finished…
❗ Once you’ve completed this commit, swap roles in your pair.
Choose another file and then go through the steps in the Creating a commit section
Group discussion/demo 🧵 🗣️
- Group discussion/demo
- ⏲️ 10 mins
- A volunteer will need to facilitate this section
A volunteer will now need to navigate with directions from the group. Go through the git commit steps together.
Also use this time for clarifying questions.
🫸 Pushing
🎯 Goal: Push a branch to a remote repository
🕹️ Activity - Figure it out 🔍
- Trainees work in pairs
- ⏲️ 5 mins
After committing your work on your machine, you’ll have a local branch that looks like this
📋 Double-check you’ve been committing to your branch week-1-workshop branch and not your main branch.
However, our remote fork only has a main branch:
In other words, we have not added our local branch onto the remote fork on GitHub.
To do this, we must push our branch onto GitHub.
push means adding local work to a remote GitHub repository.
🔍 Figure out how to push your local branch to the GitHub repository using the Source Control interface in VSCode.
🔍 Figure out how to check the week-1-workshop branch is on the remote fork.
Group discussion
- Group discussion/demo
- ⏲️ 5 mins
- A volunteer will need to facilitate this section
A volunteer will need to navigate and let the group guide them in following through the steps in the previous recap activity.
🧵 Tying things up
Now is some time to wrap up and discuss some of the key concepts from this week.
🗣️ Discussion in pairs
- Trainees discuss in pairs
- ⏲️ 10 mins
In your pair, discuss the following questions/tasks:
- What is a commit? Explain why we need to make commits when we’re developing a project.
- Explain why we store repositories on GitHub.
- Describe the purpose of VSCode.
- Explain the difference between Git and GitHub.
- Explain why developers use branches.
- Explain the difference between a fork and a clone.
- What does the branch name
origin/mainmean instead of justmain? - Check out the following git repository diagram below:
How many commits are in common between week-1-feature and main?
🗣️ Group discussion
- Discuss the questions together as a group. Go round and get feedback from each person in the group.
Retro: Start / Stop / Continue
Retro (20 minutes)</span>
Retro (20 minutes)</span>
A retro is a chance to reflect. You can do this on RetroTool (create a free anonymous retro and share the link with the class) or on sticky notes on a wall.
- Set a timer for 5 minutes. There’s one on the RetroTool too.
- Write down as many things as you can think of that you’d like to start, stop, and continue doing next sprint.
- Write one point per note and keep it short.
- When the timer goes off, one person should set a timer for 1 minute and group the notes into themes.
- Next, set a timer for 2 minutes and all vote on the most important themes by adding a dot or a +1 to the note.
- Finally, set a timer for 8 minutes and all discuss the top three themes.